在使用SpringBoot开发中,有些业务处理时间比较久,需要新开线程实现业务的异步处理。通常的做法是建立一个线程池,然后把需要异步处理的任务交给线程池处理。在SpringBoot上,可以不需要这么麻烦,只需要在需要异步处理的方法上加一个简单的注解@Async即可实现异步操作。
这里有一个要注意的是,不要忘记在启动类上增加@EnableAsync注解,缺少这个注解异步将不会生效。
@SpringBootApplication
@EnableAsync
public class DemoApplication {

    public static void main(String[] args) {
        SpringApplication.run(DemoApplication.class, args);
    }

}
这里举一个小例子进行演示,方法实现仅打印一下当前线程名:
@Service
public class TestService {

    public void test() {
        System.out.println("同步方法使用线程");
        System.out.println(Thread.currentThread().getName());
        System.out.println("-------------");
    }

    @Async
    public void asyncTest() {
        System.out.println("异步方法使用线程");
        System.out.println(Thread.currentThread().getName());
        System.out.println("-------------");
    }

}
触发异步的web请求:
@RestController
@RequestMapping("/")
public class TestController {

    @Autowired
    private TestService testService;

    @GetMapping("/test")
    public String test() {
        System.out.println("web请求使用线程");
        System.out.println(Thread.currentThread().getName());
        System.out.println("-------------");
        testService.test();
        testService.asyncTest();
        return "test";
    }

}
结果: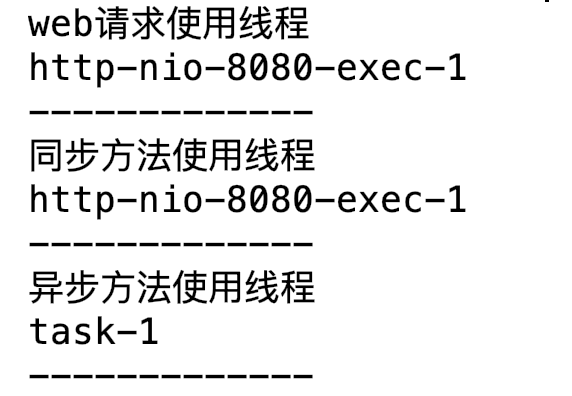
可以看到异步注解@Async生效了,使用的是不同的线程。
@Async本质上还是使用的线程池,只是SpringBoot帮我们简化了很多操作,那如果我们需要自定义异步任务使用的线程池呢?也是可以实现,只是我们需要一个配置类。
/**
 * Async注解配置
 */
@Configuration
public class AsyncConfig implements AsyncConfigurer {

    /**
     * 使用的线程池
     *
     * @return
     */
    @Override
    public Executor getAsyncExecutor() {
        return new ThreadPoolExecutor(
                1, 16,
                60L, TimeUnit.SECONDS,
                new SynchronousQueue<>(),
                new ThreadPoolExecutor.CallerRunsPolicy()
        );
    }

    /**
     * 异常处理
     *
     * @return
     */
    @Override
    public AsyncUncaughtExceptionHandler getAsyncUncaughtExceptionHandler() {
        return null;
    }

}
配置类实现了AsyncConfigurer接口中的2个方法
1、getAsyncExecutor()方法用来获取@Async默认线程池,即我们如果需要自定义@Async默认线程池则直接在此方法中实例化一个线程池并返回即可;
2、getAsyncUncaughtExceptionHandler()是用来返回对异步任务异常之后的一些处理,这里暂时没用配置直接返回null;
如果我们项目中存在多个线程池,也可以在@Async(“example”)注解上指定想要使用的线程池name,前提是这个线程池被Spring容器管理。
使用自定义example线程池的方法示例:
@Async("example")
public void asyncExampleTest() {
    System.out.println("异步方法使用自定义example线程");
    System.out.println(Thread.currentThread().getName());
    System.out.println("-------------");
}
代码:https://gitee.com/lqccan/blog-demo/tree/master/SpringBoot/async